


The first thing I did was make a straight line with the painter's tape. My suggestion? Don't tape it together like I did. It makes it *fun* to take off once the glitter is on. More on this later.

Used the Mod Podge glue on one side. Just used my finger to apply it. Keep a wet paper towel or dish rag with you to wipe your fingers clean after this part.

I couldn't decided if I wanted super feminine keys (pink and purple), or if I wanted to use the other colors. I eventually decided to mix the two together. I really like how they came out!

After the glue dries (I let them dry for about 30 minutes), use the Mod Podge clear acrylic sealer to seal the glitter (so it doesn't fall off!). I took the keys outside and sprayed them. Don't spray them too close, or the glitter will come off. Just lightly spritz them with the sealer and it does the trick!


This project is one I was super excited about. If you happen to follow me on Pinterest, you'll have already seen this transformation! (If not, I'm @mrsdscorner).
When my husband told me that the dedicated office in the house was mine and mine only (he got an entire bedroom that we now dub his "eBay Room"... he sells junk on there, pretty awesome hobby actually!), I was super excited.

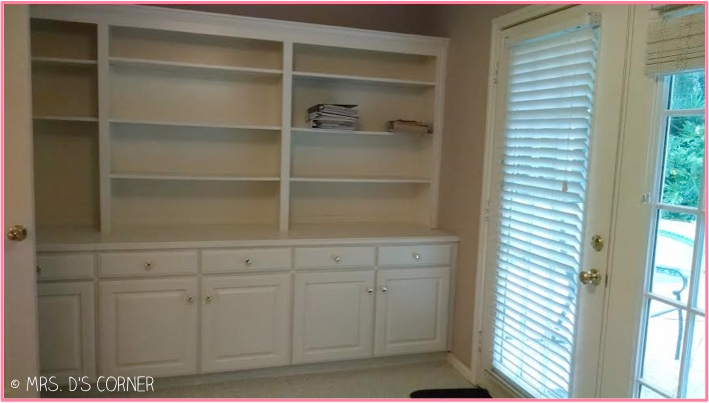
I've always dreamed of having my own office. The one in our new house is
gorgeous, too. Lots of space and built-ins. It just needed some paint and my personal touch.

After painting the walls and changing out all of the gold knobs for dark, tarnished silver knobs and handles, I decided to puruse Pinterest. I mean, what good are all of those "pins" if I never use them?! I have a board called "Dream Office" and had this pinned.

Perfect, right?! Pinterest definitely gets a double high-five from me on this find!
So I started with getting my supplies ready and taking the shelves out.


The walls behind the shelves were actually pretty gross. I mean, yellow in color gross. Not a yellow that you can clean off either. Gross!
I taped off the insides and began painting...


I probably should have used a vinyl paint or something different because of the material the shelves are made out of. I noticed as I was taking the blue tape off, that it was literally peeling the paint from the sides. Normal paint on walls doesn't do that... so if I ever need to redo the shelves, I'll have to look into that. To fix it, I just let it fully dry and touched up the paint that peeled. It's barely noticeable!

I mean, gorgeous right!? I am in love! Love, love, love my office, you have no idea... now to fill up those shelves with decorations, books and office supplies. I have 4 shelves filled, so I've got my work cut out for me. I will definitely be posting my final picture once the shelves are fully decorated!

Roll call, who is going to Vegas this week?! THIS WEEK... wait a minute, when did that happen? I had better start packing! Before I begin planning what to wear, let me share what I made with you :)

The wonderful Flying Into First Grade posted an amazing Vegas freebie for us to keep track of the experience.
I printed out all of my conference handouts (which I found through the TPT blog) and then printed out Latoya's freebie. The pages in the memory book are just phenomenal... she really took the time to include all the little pieces like flight information, hotel information, who we are traveling with, who we sit next to, and so much more.
After printing it out and putting it in an order that made sense to me, I took it to Staples and got it bound for $4! Not even kidding you... I was surprised at the quality of the binding (along with the front and back covers) for only $4.
I got home and started filling out the pages I could (like flight and hotel). I'm really excited to meet everyone (and a little nervous if I'm being honest)... I feel like I'm about to meet celebrities. I wish I were kidding, but I truly feel so blessed and honored to be able to meet so many of the *famous* TPT teacher-authors next week. It's going to be such a great experience!

I don't think this last one counts as a Monday I Made It because I didn't technically make anything... but I got dressed (that means I didn't wear sweatpants) and did my hair (for the first time in 3 weeks) and did my makeup (again, probably about 3 weeks since that happened). Please tell me I'm not the only teacher who lives in active shorts and a t-shirt in the summer?!

I got my new school ID! Since all of our stuff was in storage on the other side of Houston, I had to wait to get my passport to finish the I-9 form. As soon as we found the lockbox, I grabbed my passport and headed over to school (okay, so maybe it was the next day). I was super excited to get my new school ID, can you tell?!
Wow, can you tell I've been super busy the last 2 weeks?! What has everyone else been up to? How was your 4th of July weekend?

I LOVE your new office!!! Those built in shelves are amazing. I doubt my husband will even allow me to have an office like that because he knows that I would never come out! I'll be in Vegas!
ReplyDeletehttp://www.teacherspayteachers.com/Store/Jamie-Sears
Your office looks like a dream! I can't wait to see the finished pictures!
ReplyDeleteJenny
Livin’ the Third Grade Dream
LOVE LOVE that color in the back of your office shelves!!!!!! SO beautiful!!! Thanks for linking up;)
ReplyDelete4th Grade Frolics